Recently I’ve been working on a project that uses Azure DevOps as the remote repo, but Azure DevOps does not include any way to resolve merge conflicts in Git remotely. What you can do is deal with the merge conflicts locally so I’ll include the instructions as to how to do that here, and this post therefore gives you the info you need to resolve any merge conflicts using the command line, and in this case VS Code. I use a Git Bash terminal in VS Code so will base my instructions on that, but you can use any terminal to run the commands.
Table of contents
Prepare your git branches before you merge
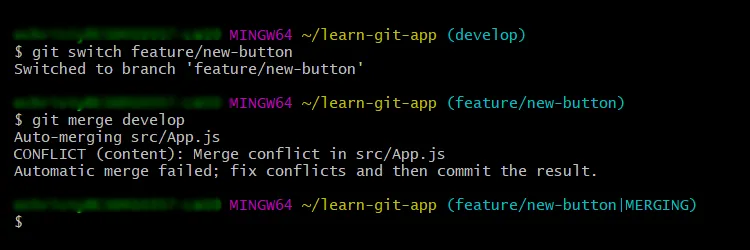
Let’s say you’re working on a feature branch called feature/new-button and there’s a conflict with the main branch develop. To resolve the conflicts you start by locally merging the develop branch into your feature branch.
Make sure you have done a git pull on your develop branch to start with so that you have all the latest changes. Then you need to run 2 commands like this:
git checkout <the branch you want to merge the changes into>

git merge <the branch you want the changes from>
The git checkout branch-name switches you to the branch you specify, in fact you can also use git switch in place of git checkout, they do the same thing in newer versions of git.
The git merge branch-name command tries to merge the branches. So in this example it would be:
git checkout feature/new-button

git merge develop
That will merge the changes from the develop branch into the feature/new-button branch, but because there are conflicts this puts you in the process of MERGING (notice the MERGING text by the branch name in the image below).

View the merge conflicts
You are now in the process of MERGING and VS Code shows a merge conflict warning in the terminal:
"automatic merge failed: fix conflicts and then commit the result"
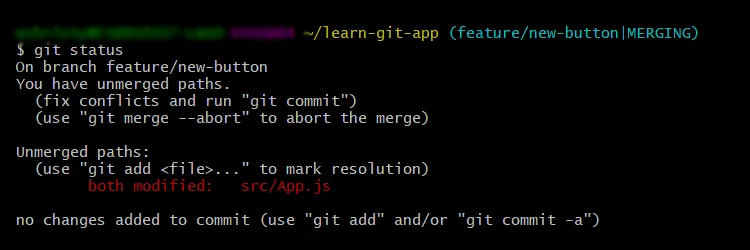
VS Code also shows the files which have conflicts in the source control side bar. You can use git status at any time to get an overview of your conflicts along with some info on how to mark issues as resolved. In the image below you can see the text in red which starts with “both modified”, it is telling you that on both branches the named file has been modified and therefore they are ‘in conflict with each other’.

In the message above it says ‘use “git add …” to mark resolution’ so when you have corrected the conflicts in the file itself you use this command to stage the changes.
git add file-name
Resolve the merge conflicts – code conflicts
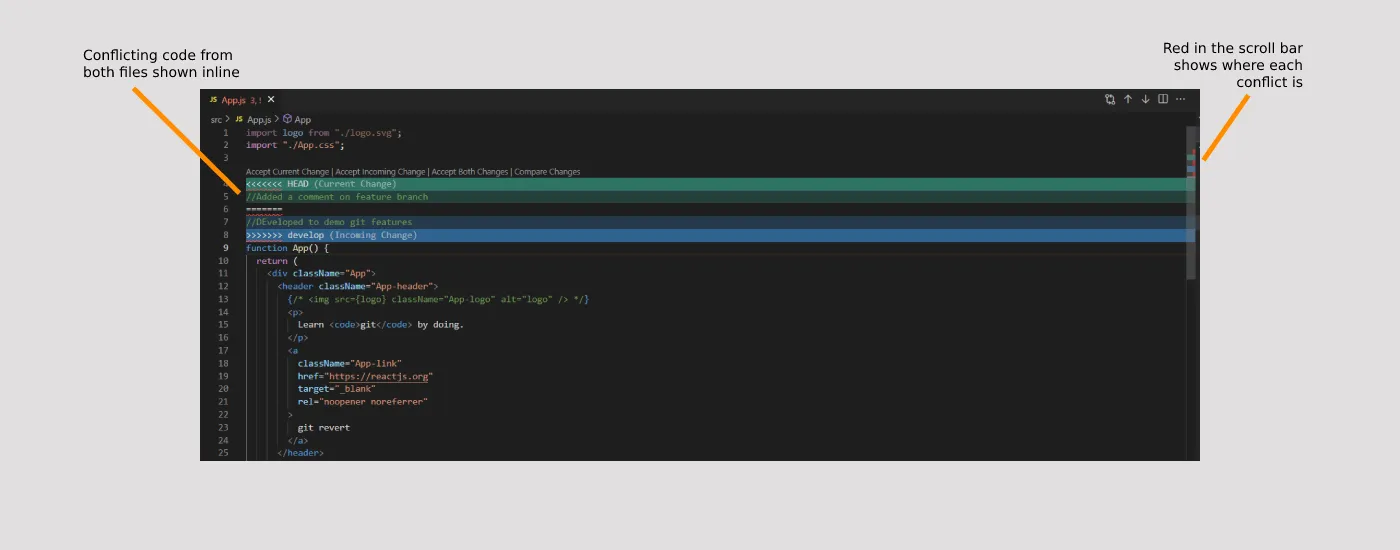
Open the file(s) with conflicts and you’ll see some colours shown in the scrollbar where the colour red represents each conflict. It also shows the code conflicts inline with an option to Accept the Current change, or to Accept the Incoming Change. You can work your way through these merge conflicts one by one or if you know you want ‘All Current changes‘ for instance then in the git source control sidebar in VS Code you can right click on the file being merged and select ‘Accept all current changes‘. Then save your file.

Resolve the merge conflicts – file conflicts
In this case you will see a message like:
Unmerged paths:
(use "git add/rm …" as appropriate to mark resolution)
deleted by them: src/components/filename.jsx
If you want to remove that file from your branch to resolve the merge conflict :
git rm filename
If you want to add the file:
git add filename
Now you commit those changes by adding an appropriate message:
git commit -m "Resolved merge conflict by keeping filename.jsx file."
Commit your changes
Once you’ve resolved your merge conflicts in git and committed your changes, the MERGING process is complete, and if you do a git status you should see that you have commits ready to push. Now you can push those changes safe in the knowledge that you’ve resolved all your conflicts.
Using Command Line
git add .

- or-

git add file-name
… and then commit these changes with a message relevant to the merge.
git commit -m "Resolved conflicts and merged"
Now you can push the changes to the remote branch and continue.
git push
Using VIM
I’ve typed git commit and pressed return, the Git Bash terminal shows me a VIM editor and a default commit message for the merge. Once your commit message is entered do this to save and continue:
- Press the ESC key
- Type :wq
In case you are wondering “:wq is write and quit“.
Now do another git status and you will see that your local branch has several commits ready to be pushed to the remote branch.
If your merge goes wrong
Maybe you are in the process of merging and you’ve realised something has gone wrong. Or perhaps you have merged some files and committed your changes, only to realise you’ve broken something. Here are some tips which will help.
How to cancel a merge (‘merging’)
If you are in the middle of the merge process you cancel this by typing:
git merge --abort
You can undo your last commit by using:
git reset --soft HEAD~1
If you want to go back to a specific commit then once you know it;s commit number you do this:
git reset --soft number
You won’t initially see any changes in your site at that point because although we’ve rolled back to the commit, all your file changes have been kept. But now you can discard all changes and then you should be back to where you want to be.
Summary
That should have covered most issues you may encounter when trying to resolve merge conflicts in git. I can’t wait until the UI get updated in Azure DevOps to include the ability to do this visually!
