Most web apps will need to consume some data from an API. As with everything, there are many ways you can do this in a React app, but in this post I’ll focus on showing you how to GET data from an API using an Axios GET request. I’ll also explain how to show the data on the screen. We’ll start by installing Axios, then we’ll write the Axios.GET example code to get data from the API and show it on a page. We’ll be using Fakestore API so make sure you can access that ok here – https://fakestoreapi.com. This post will focus on using Axios rather than Fetch, which is the default, out of the box solution. But if you’d rather use fetch to get your API data, I’ve written a post about that too.
Table of contents
To get started
Before we start you need a basic React app to put this code into. If you don’t already have one ready then create a React app in the normal way :
npx create-react-app axios-example
cd axios-example
npm start //check it loads ok
Note – I’ve written a post about what to do if you get an error message saying something like npm WARN exec – package was not found: create-react-app.
Install Axios and check it’s working
To install Axios, use this command:
npm install axiosNow we’ll write some code to do a simple GET request to get some data from the Fakestore API.
Use Axios to GET API data
For the GET example we’ll be using this endpoint: GET https://fakestoreapi.com/products which will return a list of products. To start with we need to import Axios from the package you’ve just installed, like this:
//put this line at the top of App.js
import axios from "axios";
The simplest axios.get example
The simplest example of all is to use this code format and axios.get :
axios.get('https://fakestoreapi.com/products')
And that will work just fine. However, there’s a slightly different way to configure your code which will make it much easier to move on to doing a POST with Axios, and much easier to turn this into a reusable Axios instance. That’s something you’ll definitely want to do to use this in a real production app.
Developing the axios.get code for a better example
So now we’ll use another example to GET data from the /products endpoint using Axios. Next add the getData function to your App.js file :
const getData = () => {
    // GET request for products from fakestore API
    axios({
      method: "get",
      baseURL: "https://fakestoreapi.com",
      url: "/products",
    })
      .then(function (response) {
        // handle success
        console.log(response);
      })
      .catch(function (error) {
        // handle error
        console.log(error);
      });
  };
Now let’s add a button to the page which calls the getData method :
//add this to the main section in your App.js file
<button onClick={getData}>GET data</button>
By now your App.js file should look like this – I’ve added some detail to the JSX as well, so you could just copy this and replace the whole of your App.js file:
import "./App.css";
import axios from "axios";

function App() {
  const getData = () => {
    // GET request for products from fakestore API
    axios({
      method: "get",
      baseURL: "https://fakestoreapi.com",
      url: "/products",
    })
      .then(function (response) {
        // handle success
        console.log(response);
      })
      .catch(function (error) {
        // handle error
        console.log(error);
      });
  };

  return (
    <div className="App">
      <header className="App-header">
        <p>
          GET and POST using <code>Axios</code>.
        </p>
      </header>

      <p>
        <button onClick={getData}>GET data</button>
      </p>
    </div>
  );
}

export default App;
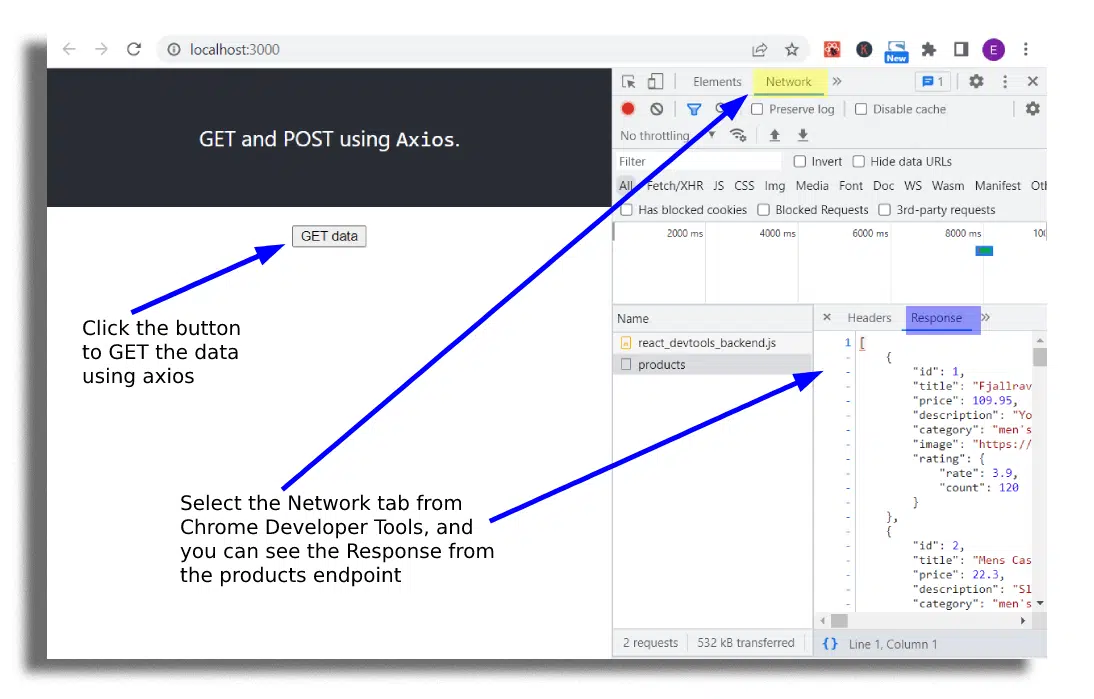
If you run your app now using npm start you’ll see the button on the screen. Open the Chrome Developer tools before you click the button, that way you’ll see the response in the Network tab. Once you’re ready, click the button and you should see the Axios GET request response from the Products endpoint like this:
At this stage we haven’t really used the data that comes back from the API, all we’ve done so far is console.log it so we can see we’re getting the data back. I’d always recommend doing this before you write any more code, just to be sure it’s all working ok and that you’re getting the response you’re expecting.
Show the Axios GET request data on screen
To show the data on the screen in the simplest way possible we will use the React useState hook. You can read more about it here, but in this post I’ll just show you how to use it.
Store the API data in state
First let’s define the state value within which we will store the list of products :
const [products, setProducts] = useState(null);
We will call the method setProducts to store our data in the object products. We also define the default value of products in the useState method, which in this case is null.
So when we handle the success response of our endpoint we now want to store the data returned by adding a line of code like this:
...
.then(function (response) {
  // handle success
  console.log(response);
  //add this line to store the data returned in state
  setProducts(response.data);
})
...
Now the value is stored in state we need to show it on the page, so we add some code to the layout like this:
...
<p>
  <button onClick={getData}>GET data</button>
</p>
<ul>
    {products?.map((product) => {
      return <li key={product.id}>{product.title}</li>;
    })}
</ul>
...
Once the data returns from the API endpoint we store the data in products. We then use the JavaScript .map function to iterate through the list of items in the list, showing the title of each. The question mark in products?.map ensures no error is thrown if products is null.
Summary
You should now know how to request data from an API in a React app using an Axios GET request. I’ve also provided an example of how to show the data returned on screen. My next post will cover how to POST data to an API using Axios. I’ve also written another post explaining how to use custom response headers with Axios, which are often used when getting paginated data.
Full code for the Axios.Get example
You can download all the code from this blog post from my github repo.