Following on from my previous post which explains how to GET data from an API using Axios in React, in this post I’ll focus on showing you how to POST data to an API using Axios. I’ll include an example of how to create the Axios.post request body. We’ll start by installing Axios, then we’ll write the Axios POST example code to send data to the API and handle the response. We’ll be using Fakestore API so make sure you can access that ok here – https://fakestoreapi.com.
Table of contents
To get started
Before we start you need a basic React app to put this code into. If you don’t already have one ready then create a React app in the normal way :
npx create-react-app axios-example
cd axios-example
npm start //check it loads ok
Install Axios and check it’s working
To install Axios, use this command:
npm install axiosNow we’ll write some code to do a simple POST request to get some data from the Fakestore API.
Get the code from my previous post
You could also start by getting the code from my previous post which explains how to GET data using Axios.
Use Axios to POST API data
For the POST example we’ll be using this endpoint:
POST https://fakestoreapi.com/products
which will return the id of the newly created product.
To start with we need to import Axios from the package you’ve just installed, like this:
//put this line at the top of App.js
import axios from "axios";
An axios.post example
Now we’ll write the code to POST data to the /products endpoint using Axios. The key difference between getting and posting data is that when you GET you are only receiving data, but when you POST you are sending data. So how do we do that? You POST data by sending a request body – also referred to as a data payload.
Create the request body data payload
The request body must be a valid JSON object, it’s essentially a list of property names and values. Here’s what we’ll be sending to FakeStoreApi, it will create a new product.
var data = {
    title: "A test product",
    price: 14.5,
    description: "lorem ipsum set",
    image: "https://i.pravatar.cc",
    category: "electronic",
  };
Next add the postData function to your App.js file. You can see another difference from the Axios GET example, is that there’s an extra parameter – payload. We send our data object in here :
const postData = () => {
    // POST request for products from fakestore API
    axios({
      method: "post",
      baseURL: "https://fakestoreapi.com",
      url: "/products",
      payload: data,
    })
      .then(function (response) {
        // handle success
        console.log(response);
      })
      .catch(function (error) {
        // handle error
        console.log(error);
      });
  };
Now let’s add a button to the page which calls the postData method :
//add this to the main section in your App.js file
<button onClick={postData}>POST data</button>
By now your App.js file should look like this – I’ve added some detail to the JSX as well, so you could just copy this and replace the whole of your App.js file:
import "./App.css";
import axios from "axios";

function App() {
  //const [product, setProduct] = useState(null);

  var data = {
    title: "A test product",
    price: 14.5,
    description: "lorem ipsum set",
    image: "https://i.pravatar.cc",
    category: "electronic",
  };

  const postData = () => {
    // POST request for products from fakestore API
    axios({
      method: "post",
      baseURL: "https://fakestoreapi.com",
      url: "/products",
      payload: data,
    })
      .then(function (response) {
        // handle success
        console.log(response);
      })
      .catch(function (error) {
        // handle error
        console.log(error);
      });
  };

  return (
    <div className="App">
      <header className="App-header">
        <p>
          POST using <code>Axios</code>.
        </p>
      </header>

      <p>
        <button onClick={postData}>POST data</button>
      </p>
    </div>
  );
}

export default App;
If you run your app now using npm start you’ll see the button on the screen. Open the Chrome Developer tools before you click the button, that way you’ll see the response in the Network tab. Once you’re ready, click the button and you should see the response from the Products POST endpoint like this:
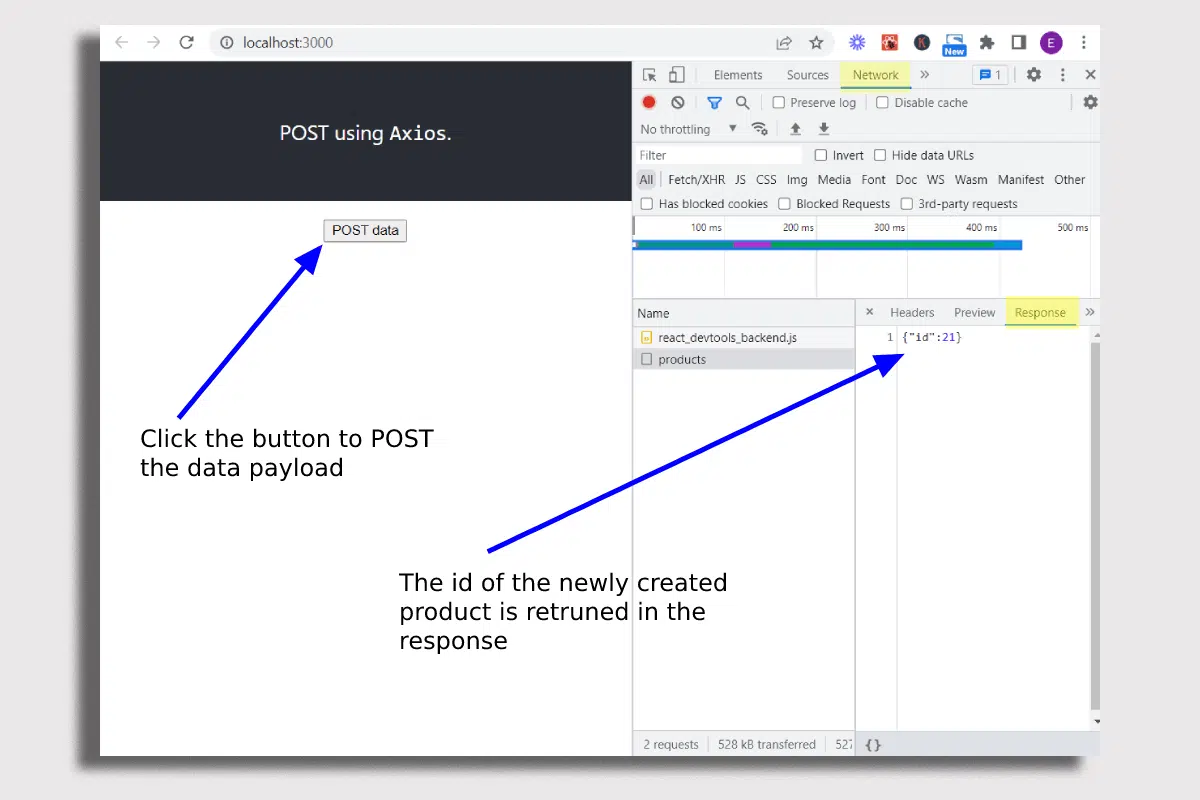
In the console.log message you should see that we received the id of the newly created product as a response. I’d always recommend doing this before you write any more code, just to be sure it’s all working ok and that you’re getting the response you’re expecting.
Full code for the Axios.Post example
You can download all the code from this blog post from my github repo.
Summary
You now know how to send data to an API in a React app using an Axios POST request. You may want to check out my previous post which covers how to GET data from an API using Axios.